
The fastest, safest way to share designs with clients is a controlled review link paired with a short brief and a structured feedback form. Send a Figma prototype link set to "can view" or "can comment," attach three focused prompts, and give clients a short deadline. That combination alone eliminates most of the vague, back-and-forth feedback that slows projects down.
Quick-start checklist:
- Set the share link to "can view" or "can comment" — never "can edit" for standard client reviews
- Label the file with a version number and date before sending (e.g.,
Checkout_v02_2026-04) - Attach a one-paragraph brief with specific review prompts
- Set a clear deadline for quick reviews; longer deadlines for larger stakeholder groups
- Use a platform like Usepinhub for pinned, in-context comments from guest reviewers who don't need an account, or Typeform for a structured feedback form alongside the link
Key Takeaways
Sharing designs with clients effectively comes down to one repeatable system: a controlled review link, a short brief with focused prompts, in-context comments, and a structured feedback form for every round.
| Point | Details |
|---|---|
| Lead with a controlled link | Send a view/comment link with a version label and a 3-day deadline every time. |
| Default to view or comment | Reserve "can edit" for collaborators; clients almost never need it. |
| Combine comments and a form | In-context pins capture "where"; a structured form captures "why" and overall impressions. |
| Name files consistently | Use ProjectName_v##_YYYY-MM_role to keep history clear and avoid version confusion. |
| Usepinhub for guest reviews | Usepinhub lets clients pin comments without accounts and logs every interaction for your audit trail. |
Table of Contents
- What should you share at each project stage?
- How do you control access and protect shared design links?
- How do you collect feedback that's actually useful?
- A compact review workflow you can copy and reuse
- Export formats, file naming, and version control
- When should you share source files, and how do you protect your IP?
- Which tool type fits each stage of your design sharing workflow?
- Client feedback form template and a review email you can copy
- Why a controlled sharing workflow saves more than just time
- Usepinhub makes the review workflow concrete
- Sources
- FAQ
What should you share at each project stage?
Not every stage of a project calls for the same type of file. Sharing too much too early exposes unfinished work and invites out-of-scope feedback. Sharing too little at handoff creates friction. Here's how to match what you send to where the project actually is.
Preview stage: Share low-fidelity wireframes, click-through prototype links, or a short screen recording. The goal is directional feedback, not pixel-level critique. A Loom recording with a voiceover works well here because it guides the client's attention without requiring them to navigate anything on their own.
Review stage: This is where interactive prototypes and high-fidelity screens belong. Enable in-context commenting, attach a one-paragraph brief, and include a feedback form. Figma's prototype-only links let clients interact with the design without seeing layers, component names, or editor controls — though note that truly prototype-only sharing is a paid feature on many platforms; free plans may still expose the editor.
Approval stage: Send a flattened PDF export or pixel-perfect PNG set. Include the version number, a brief summary of what changed since the last round, and an acceptance checkbox or a short sign-off line the client can reply to in writing. This creates a paper trail.
Handoff stage: Source files — Figma files, layered PSDs, or AI files — go out only after the contract terms are met and final payment clears. Before that point, offer limited exportables: optimized PNGs, a style guide PDF, or a preview-only workspace with selective folder access.
- Never share source files on unpaid work or during early drafts
- If a client needs to test on their own device, a mirror app like Sketch View and Mirror can help, though it won't capture annotated feedback the way a dedicated review tool does
- For clients who prefer not to log in anywhere, a PDF export or screen recording covers most preview and approval needs
Pro Tip: Pair a prototype-only link with a separate deliverables workspace. Clients get the interactive experience they want; your design system stays private.
How do you control access and protect shared design links?
Permission settings are the first line of defense when you share mockups with clients. Getting them wrong costs you either security or convenience, and usually both.
Permission levels and when to use each:
- Can view: The default for client reviews. Clients see the design, can't touch layers.
- Can comment: Appropriate when you want in-context annotations directly on the file. Still read-only for editing.
- Can edit: Reserve this for collaborators who genuinely need to modify the file — almost never a client.
Guides on giving clients Figma access consistently recommend "can view" or "can comment" for most client reviews and flag "can edit" as a seat that should only be granted when the client must make changes themselves.
Link type: "Anyone with the link" vs. "Only invited"
Use "anyone with the link" when the client is low-risk, the project is under NDA, and you want frictionless access. Switch to "only invited" when the project is sensitive, the client has multiple stakeholders you haven't vetted, or the design contains proprietary brand assets.
Passwords and expiry windows:
Add password protection for any link that goes to a large stakeholder group or contains unreleased product work. Set review windows of 48–72 hours for quick feedback rounds and up to 7 days when senior decision-makers are involved. After the window closes, revoke the link or change the password.
Guest reviewer workflows:
Platforms that support accountless commenting — the approach Usepinhub uses — reduce friction significantly. Clients don't need to create a seat or remember a login. They open the link, pin a comment, and you get a timestamped, location-anchored note. That's a better outcome than an email that says "the button looks off."

Pro Tip: After every project handoff, audit your active share links and revoke any that are no longer needed. A link left open is an open door.
How do you collect feedback that's actually useful?
Email threads produce vague feedback. "The colors feel off" tells you nothing. In-context comments anchored to specific pixels tell you everything.
The core principle is specificity. When a client pins a comment directly on the checkout button and writes "this feels too aggressive for our audience — can we soften the label?" you have a location, a reason, and a direction. That's a change you can make in one pass.
Annotation best practices:
- Ask clients to pin comments to specific elements, not to the overall design
- Request that each comment include an expected outcome ("change to" or "feels like") and a priority level (must-fix, nice-to-have)
- Use a brief with focused prompts: "Does the checkout flow feel trustworthy?" or "Is the hierarchy clear on the homepage hero?"
Numbered workflow for collecting in-context feedback:
- Share the prototype link with "can comment" enabled
- Send the brief with three to five focused prompts
- Give a 48–72 hour review window with a clear deadline
- Client pins comments on specific elements
- You consolidate comments into a prioritized change log and reply in each thread with your plan
- Close resolved threads; leave open ones for the next round
Combining in-context comments with a structured feedback form covers two different types of input. Comments capture specific, located reactions. Forms capture overall impressions, business context, and preferences that don't attach to a single pixel. Conversational feedback forms with conditional logic produce more detailed responses than a static grid survey and can route answers directly to a Slack channel or Google Sheet for tracking.
For clients who prefer a live walkthrough, screen sharing is a reasonable option for guided reviews, though it doesn't replace structured in-context feedback as a record of what was discussed.
A compact review workflow you can copy and reuse
Standardizing your review process is one of the highest-leverage things you can do as a freelance or professional designer. It sets expectations, reduces scope creep, and speeds approvals. Here's a workflow you can paste directly into a proposal or project brief.
Step-by-step:
- Invite: Send the review link with permissions set to "can view" or "can comment"
- Brief: Attach a one-paragraph context note with three focused prompts and the version label
- Review window: Set a deadline (48–72 hours for small reviews; up to 7 days for larger groups)
- Consolidate: Gather all comments and form responses; summarize into a prioritized change log
- Iterate: Make changes, label the new version, and share the updated link
- Sign-off: Send a sign-off message with the final version and an acceptance line
Who does what:
- Client: reviews the prototype, pins comments, completes the feedback form
- Internal reviewer (if applicable): checks for brand consistency before the client sees it
- Designer: synthesizes all feedback, posts a change log, and manages the thread
Timeline examples:
- Small project (1–2 screens): one round, 48-hour window
- Medium project (5–10 screens): two rounds, 72-hour windows
- Large project (full product or site): two to three rounds, up to 7 days each
Copyable message templates:
Invite message:
Hi [Name], here's the [v02] design for review: [link]. Please focus on [specific area]. Add comments directly on the design or complete the short form here: [form link]. Deadline: [date]. Thanks!
Reminder message:
Quick reminder — the review window closes [date]. If you have comments, please add them before then so we can stay on schedule.
Sign-off message:
Here's the final version [v03]: [link]. Please reply with "approved" or sign the attached PDF to confirm acceptance. Let me know if you have any questions.
Avoid open-ended reviews by stating the number of revision rounds in your contract and referencing it in every invite message. Two rounds is a reasonable default for most projects.
Export formats, file naming, and version control
A clear file naming system prevents the "final_FINAL_v2_USE-THIS-ONE" problem that wastes time for everyone. Set the convention at the start of the project and stick to it.
Export formats by purpose:
- PNG/JPG: Previews, presentations, and quick client shares
- PDF: Approval-stage exports and signed sign-off records
- SVG / optimized PNG: Production-ready assets for developers
- Source files (Figma, PSD, AI): Handoff only, after payment and contract terms are met
Naming convention:
Use the pattern ProjectName_v##_YYYY-MM_role. For example: Checkout_v03_2026-03_designer or Homepage_v01_2026-04_client-review. The role suffix clarifies who the file is intended for and at what stage.
Version control in practice:
- Use incremental version tags (v01, v02, v03) rather than "revised" or "updated"
- Keep an archive folder for superseded versions so you can reference earlier decisions
- Attach a lightweight changelog to each review round: a bullet list of what changed since the last version
Handling large files:
Use cloud storage links (Google Drive, Dropbox) with selective folder access rather than email attachments. For very large assets, compressed exports or a shared workspace with folder-level permissions keep things organized without overwhelming the client.
Approval records:
Include an approval certificate or a signed sign-off PDF as the canonical acceptance record for each milestone. This is the document you reference if scope disputes arise later. An evaluation checklist tied to each version helps both you and the client confirm what was reviewed and accepted.
When should you share source files, and how do you protect your IP?
The general rule is simple: source files go out after final payment or at the contract milestone that specifies handoff. Delivering them earlier, even to a trusted client, creates risk that's hard to undo.
Contract clauses to include:
- Deliverables list: Specify exactly what files are included in the handoff (Figma file, exported assets, style guide PDF)
- License scope: Distinguish between use rights and ownership. A client can have a license to use the design without owning the source file
- Payment-triggered handoff: State explicitly that source files are released upon receipt of final payment
- Confidentiality/NDA reference: Reference any NDA in the contract and in the handoff email
Practical alternatives to early source-file sharing:
- Provide layered exports (organized PNG sets by component)
- Share editable design tokens or a style guide PDF
- Give access to a preview-only workspace with selective folder permissions
Audit trail:
Keep records of who accessed shared links, when comments were posted, and which version was approved. Platforms that log access and timestamp comments give you this automatically. A signed approval PDF adds a second layer.
Pro Tip: Add a one-sentence license header to every handoff package: "Files licensed for [permitted use] by [client name]. Redistribution or resale is not permitted without written consent."
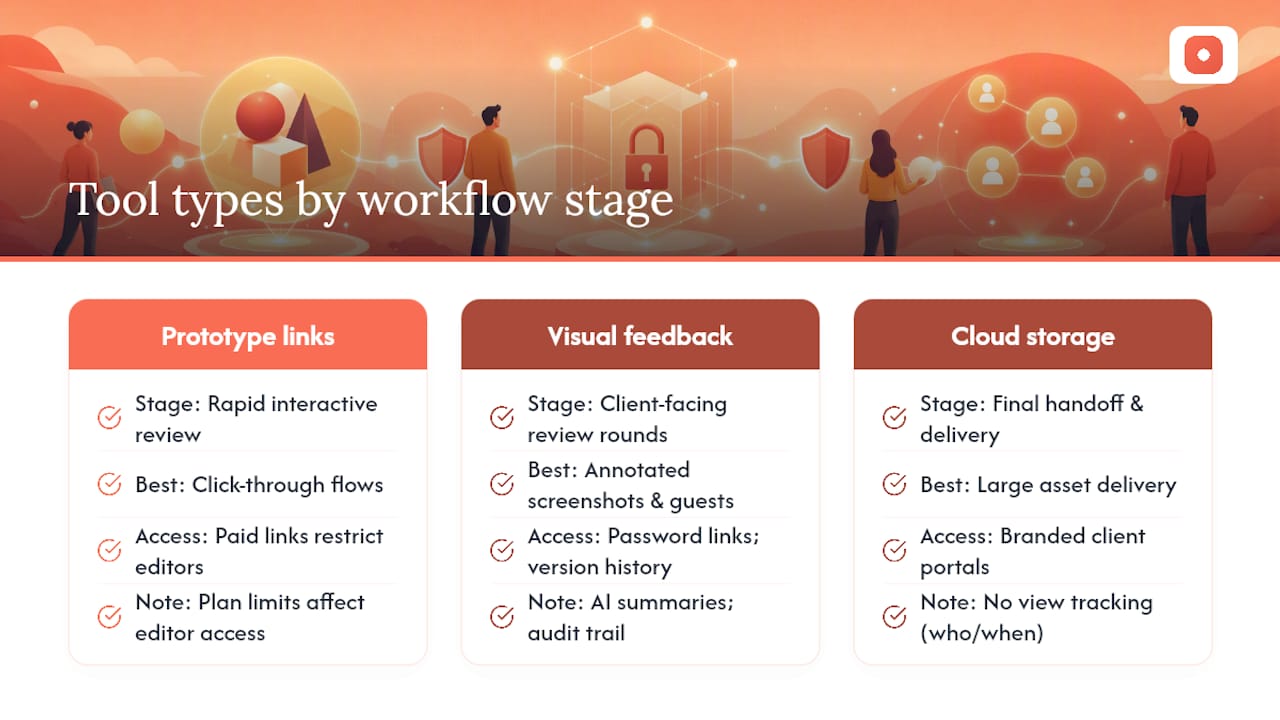
Which tool type fits each stage of your design sharing workflow?
No single tool covers every sharing need. The right choice depends on the stage, the client's technical comfort, and how much security the project requires.
Design-app share links (Figma prototypes, Sketch preview):
Best for interactive, rapid review rounds where the client needs to click through flows. Watch for plan limits: prototype-only links that truly restrict editor access are often a paid feature. Free plans may expose the editor to anyone with the link.
Visual feedback platforms (Usepinhub-style):
Best for annotated screenshot reviews, guest reviewers who don't have accounts, pinned comments with pixel-level precision, and building an audit trail. Usepinhub supports all of these, plus password-protected links, version history, and AI-assisted summaries. This category covers the design feedback tools most suited to client-facing review rounds where you need a record of every comment.
Cloud storage and deliverable portals (Google Drive, Dropbox, branded client portals):
Best for final handoff and large asset delivery. Not ideal for feedback collection — a shared Drive folder doesn't tell you who looked at what or when.
Screen recordings and PDFs:
Use these for clients who don't have accounts anywhere or who primarily review on mobile. A Loom walkthrough with a voiceover is often more effective than a prototype link for clients who aren't comfortable navigating interactive designs.
Integration notes:
Connect your feedback tool to Slack or Google Sheets for notifications and centralized records. Structured feedback loops, which route client responses to a shared channel, reduce the chance that a comment gets missed between tools.
For a broader survey of options by category, the creative review tools overview covers feature comparisons across tool types without requiring you to evaluate each one from scratch.
Client feedback form template and a review email you can copy
A good feedback form does two things: it captures structured ratings and it surfaces the context behind them. Here's a field set you can build in Typeform, Google Forms, or any form tool that supports conditional logic.
Feedback form fields:
- Overall rating: 1–5 scale ("How well does this design meet your expectations?")
- Usability rating: 1–5 ("How easy is it to understand what to do next?")
- Visual design rating: 1–5 ("Does the visual style match your brand?")
- Clarity rating: 1–5 ("Is the information hierarchy clear?")
- Conditional follow-up (low rating): "What would you change, and why?"
- Conditional follow-up (high rating): "What's working particularly well? Feel free to share a testimonial."
- Optional upload: Reference assets, competitor examples, or screenshots
Conditional logic setup:
Ratings of 3 or below trigger the clarifying question. Ratings of 5 trigger the testimonial prompt. This approach, recommended by Typeform's client feedback template, produces more detailed responses than a static grid and can route answers to a Slack channel or Google Sheet automatically.
Integration tip: Auto-send form responses to a shared Google Sheet so you and any internal reviewers can see all feedback in one place without digging through email.
Numbered steps for combining form and in-context comments:
- Share the prototype link (can comment) and the form link in the same message
- Ask clients to pin specific comments on the design AND complete the form
- Treat in-context comments as the "where and what" and the form as the "why and how important"
- When comments and form responses conflict, flag it in your change log and ask a clarifying question before acting
Copyable review email:
Subject: [Project Name] v02 — Ready for Your Review
Hi [Name],
The [v02] design is ready. Here's the review link: [prototype link]
Three things to focus on:
- Does the navigation feel intuitive?
- Does the visual style match your brand direction?
- Is there anything missing from the homepage?
Please add comments directly on the design and complete this short form: [form link]
Deadline: [date, 3 days from now]
Thanks for your time — your input here shapes the next round directly.
Why a controlled sharing workflow saves more than just time
The conventional wisdom is that giving clients more access makes them feel more involved. In practice, it usually produces more noise, not better feedback. When a client can edit a Figma file directly, they often do — and then you're managing their changes alongside your own. When they can see every layer and component name, they ask questions about things that aren't ready for review yet.
Controlled sharing isn't about keeping clients at arm's length. It's about directing their attention to what actually needs a decision. A prototype link with three focused prompts gets you a faster, cleaner response than an open file with no context. The brief is the part most designers skip, and it's the part that makes the biggest difference.
The other pushback designers hear is "I just want to be able to edit it myself." The right response isn't to hand over the source file. It's to offer a preview-only workspace, a style guide PDF, or a short call where you make the changes live. That approach protects your work and keeps the project moving without creating a standoff.
Standardizing your review requests also changes how clients perceive you. A designer who sends a clear link, a brief, and a deadline reads as organized and professional. That perception carries into pricing conversations, scope discussions, and referrals.
Usepinhub makes the review workflow concrete
If you've built the workflow above and want a tool that handles the technical side without friction, Usepinhub is built for exactly this. Upload a screenshot or connect a Figma design, and clients can pin comments to specific pixels without creating an account. Every comment is timestamped and location-anchored, so your change log writes itself.
Password-protected links, version history, and AI-assisted summaries map directly to the security and audit-trail steps covered in this guide. Guest reviewers get in without a login. You get a record of every comment, every version, and every approval. For web design feedback workflows that involve multiple stakeholders or rounds of revision, that audit trail is worth more than it sounds.
Start a free workspace at Usepinhub and run your next client review through it. The guest reviewer flow takes about two minutes to set up.
Sources
- Share files and prototypes – Figma Learn - Help Center
- How to Share Figma Prototypes with Clients in 2026 | Fastio
- Client feedback form template — Typeform
- How to Give Figma Access to a Client: The Complete Step-by-Step Guide
FAQ
How do you present a design to a client?
Share a prototype-only link set to "can view" or "can comment," attach a one-paragraph brief with three focused prompts, and set a clear deadline. For clients who prefer a walkthrough, a short screen recording with voiceover works well alongside the link.
What's the best way to share design files with clients?
For reviews, use a prototype link with view or comment permissions. For final handoff, use a cloud storage folder (Google Drive or Dropbox) with selective access. Platforms like Usepinhub add pinned comments and an audit trail for review rounds that involve multiple stakeholders.
How do you stop clients from stealing your designs?
Share prototype or view-only links rather than source files, and deliver source files only after final payment per your contract terms. Add password protection to sensitive links, keep an audit trail of who accessed what, and include a one-sentence license header in every handoff package.
How do you share a design portfolio with clients?
Use a password-protected portfolio link or a curated PDF export rather than an open public URL when sharing proprietary or unreleased work. For general portfolio sharing, a public Figma prototype link or a dedicated portfolio site works well.
When should you collect feedback on Figma prototypes vs. screenshots?
Use Figma prototype links when the client needs to click through flows and test interactions. Use annotated screenshots (via a platform like Usepinhub) when you want pixel-level pinned comments, guest reviewers without accounts, or a permanent record of feedback tied to a specific version.